In this video, ETA Prime shows you how to raise the Thermal Throttle limit on the Raspberry Pi 3B plus or Raspberry Pi 3A+ by modifying the Soft Temp Limit. This will increase the time our Pi’s Cpu can run at its max Base frequency for much longer therefore increasing performance in the long run.
RaspberryPi
Turn A Raspberry Pi Into A Steam Link Device – Stream Steam Games to The Pi
In this video, ETA Prime shows you how to turn a Raspberry Pi into a Steam Link Device so you can stream your favorite PC games to the Raspberry pi from your gaming Pc. He also goes over setting it up so Steam link boots on startup!
GPi (Game Boy + RetroPie) – Rerez
Retroflag GPi is a custom Raspberry Pi and Nintendo Gameboy hybrid! Is it good?
RetroFlag Gpi Case The Best Raspberry Pi GameBoy? $69.99
Final price is $69.99
RetroFlag did it again with the all New G Pi Case “GPi case” A raspberry Pi zero or Zero w powered Gameboy and its the best GameBoy Pi ETA Prime has ever tested
“Pi Zero Version”
This is going to sell out fast so stay tuned for the price and release on this awesome raspberry pi powered Gameboy released just in time for the Original GameBoys 30th anniversary!
Place holder to purchase your own.
Installing Pixel Desktop Environment on RetroPie for Raspberry Pi.
Extend the capabilities with your RetroPie device by adding a full blown Desktop environment for web browsing and other applications!
It’s actually fairly easy, and used to be included with RetroPie, Pixel Desktop Environment (formerly known as LXDE).
From either an SSH session, or directly at the console of your Raspberry Pi, you first want to load up the RetroPie-Setup Script. (To enable SSH, follow our guide)
First we want to run the RetroPie-Setup script, to do so you can use the following;
cd ~/RetroPie-Setup
sudo ./retropie-setup.sh
Once in the RetroPie-Setup screen, we want to navigate to;
Configuration / Tools
Raspbiantools
Install Pixel desktop environment
You may be prompted to install dependencies, if so be sure to choose Yes or OK.
Once complete, you will be able to find Pixel under the Ports menu!
Celebrate The Game Boy’s 30th By Putting Your Raspberry Pi Inside This Awesome Case
The art of retro gaming emulation is still frowned upon by many, but there’s no denying that the growing number of players who forgo original hardware for the convenience of all-in-one solutions, such as the Raspberry Pi system.
This pocket-sized computer can be loaded up with emulators and naughty-style ROMs to give you an instant vintage gaming collection – and it should come as no surprise to learn that many companies now produce plastic shells for the Pi which ape the look of legendary gaming systems.
We’ve already seen Pi cases shaped like NES, SNES and Mega Drive console, but this latest effort from Retroflag is the best yet. It allows you to place your Raspberry Pi Zero (or Zero W) inside an authentic-looking replica of the Game Boy, complete with a colour screen. Nintendo’s famous handheld turns 30 this week, so the timing is perfect.

SteamLink vs Raspberry Pi 3 – Which one is better?
Valve announced a few months ago they are discontinuing the Steam Link console. But, rather than abandoning the home streaming platform, they’ve also released a Steam Link app for the Raspberry Pi. But is it any good?
Installing Unified Remote for Raspberry Pi
I recently started using Unified Remote fro several of my Media Center devices and other computers through out my home, this includes my security console as well as all TVs and some various other devices.
I have a Raspberry Pi Zero W that I’ve configured for use as a portable desktop PC, and is perfect for traveling and hotel stays, yet I didn’t want to lug around a keyboard and mouse or additional hardware.
Enter Unified Remote!
It turns your cell phone into a keyboard, mouse, game controller or other remote control functionality! It does require a server component to install on each device you wish to control, but lucky for us there is a Raspberry Pi version.
To install, you can follow these simple command lines to get everything up and running.
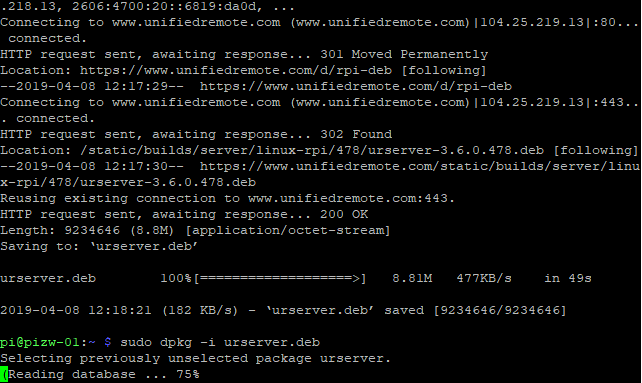
wget -O urserver.deb http://www.unifiedremote.com/d/rpi-deb
sudo dpkg -i urserver.deb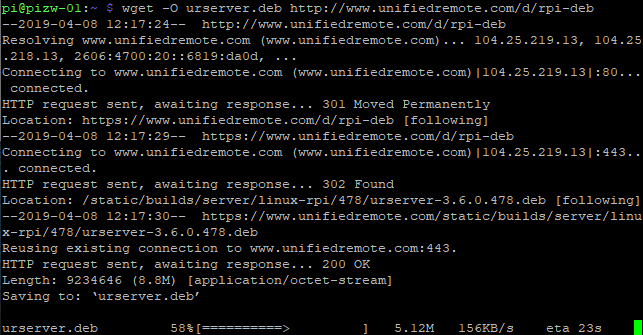
Once installed, you may need to start the service for the first time.
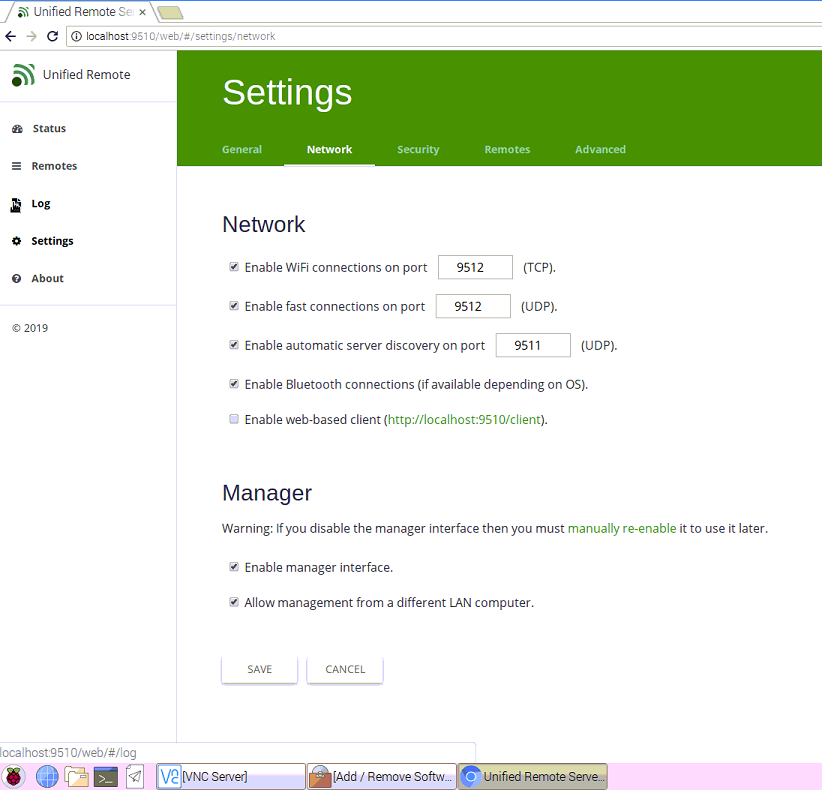
sudo /opt/urserver/urserver-startAfter the service has been started, you can either navigate to the management console on the Pi itself via http://localhost:9510/web or with the IP address of your Raspberry Pi device http://<IPAddress>:9510/web
This console will allow you to configure WiFi, Bluetooth and WebUI connectivity, set passwords and other functionality.
If you aren’t booting to a desktop environment, and instead booting to something like RetroPie, you may need to set the service to start with rc.local.
To do so, you can do the following.
sudo nano /etc/rc.localAnd add the following line, being sure to include the & at the end.
sudo /opt/urserver/urserver-start &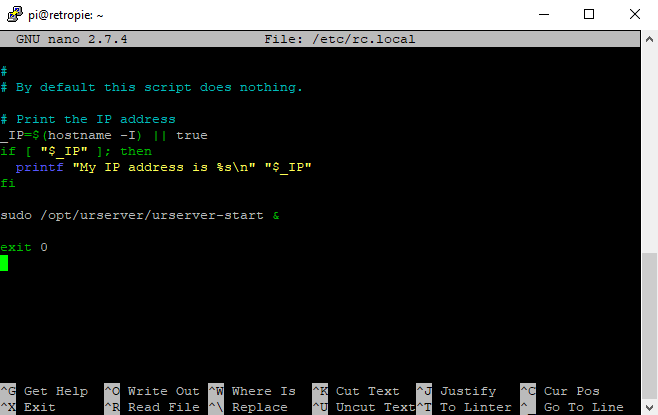
Sources:
Installing Unified Remote on Debian via CLI
Unified Remote home page
PinkyPi and PinkyPi Pro Official Images – version 1.0
I’ve finally finished the precompiled images for PinkyPi and PinkyPi Pro micro game consoles.
These images are based of RetroPie 4.4 and utilize the fbcp-ili9341 display driver.

PinkyPi 1.3LCD-
PinkyPi prebuilt image, based off RetroPie 4.4
This is for the 1.3inch (240×240) LCD display version.
Using fbcp-ili9341 display driver.
Using RetroGame GPIO controller driver.
Backlight control is enabled – to disable see here.
PinkyPi Pro –
PinkyPi Pro prebuilt image, based off RetroPie 4.4
This is for the Pro version of PinkyPi, 1.5inch screen and more buttons.
Using fbcp-ili9341 display driver.
Using RetroGame GPIO controller driver.
Using PiSNES as default SNES emulator
[download_category category=”pinky_pi_img”]