
Parts List
(full parts kits can be purchased in our Web Store)
Raspberry Pi Zero W
1.54 inch RaspberryPi Game Hat
MicroSD Card
TP4056 5V Battery Charging Module
0603 47KOhm Resistor for the Charging Module
23W Audio Amplifier
10KOhm Potentiometer
270Ohm Resistor
33nf Capacitor
Micro Speaker or Second Micro Speaker
600mAh Battery 502248
JST 2mm Battery Connector
Power Switch
M2.5x6mm Button head screws
M2.5x12mm Button head screws
M2.5 Assorted Nylon standoff kit using the 10mm standoffs from this kit (female/female)
M2.5 18mm standoffs (female/female)
The screws and standoffs needed are
2x 12mm screws
6x 6mm screws
2x 18mm standoffs (f/f)
2x 10mm standoffs (f/f)
Thingiverse 3D files
https://www.thingiverse.com/thing:3528533/
Software
PinkyPi Pro prebuilt RetroPie images can be found in our Downloads Section
Hardware Setup
For all the wiring I did the following;
Amp and audio;
Pin GPIO18 on the Raspberry PI goes to Pin 5 of the 10KOhm Pot
This is our audio signal going into the volume control.
Pin 2 of the 10KOhm Pot goes into a 270Ohm resistor that is then pulled to ground through a 33nf capacitor as well as connected to the R audio input of the amp.
The purpose of the resistor and capacitor is a low pass audio filter to eliminate hissing and noise in the speaker output.
Pin 1 of the 10KOhm Pot goes to Ground on the Pi, as well as the ground for the Amp and Audio (-) line.
Low-Pass audio filter (used in this build to reduce hiss)
High-Pass audio filter (optional, blocks lower frequencies)
Lastly, I connected 5v from the Pi into the amp, you can use pin 2 or 4 on the Pi for this.
Parts layout on the parts shelf.
Power
There are 2 power pads on the bottom of the RaspberryPi Zero, these are used to connect to the battery charging circuit.
RS - Resistor 3 needs changed on the TP4056 battery charging module, this is replaced with the 4.7kohm 603 resistor
Now that PinkyPi is starting to wrap up, and Gizard of our forums pointed out an SNES style Pi Zero hat with a larger 1.5inch screen.
Thus PinkyPi Pro was born.
It took a few weeks to arrive, but I've had it a few days now and I have been working on the case design.
As for the hardware, everything looks to be the same thus far aside from a battery, I'm looking at a 502248 battery to fit in place. Due to the design of the SNES style hat, and still wanting assembly for others to be as easy as possible. The layout of the Pi and components has changed from the original version due to the GPIO pinheader size on the new display hat.
Thus the Pi goes on the very bottom and then the middle contains the charging circuit, amp, volume wheel, speaker and battery, then last on the very top the display hat.
The case design is near complete for version 1.0 for testing and I hope to work on the hardware / software testing this weekend.
I am still toying with the trigger designs, but I think I have it to where I can say version 1.0 is pretty much ready for a full assembly and test, pending the battery arrival sadly.
Though I am going to assemble and just power it off USB so I can work out the software and button configuration.
I'm nearly complete with version 1.0 of PinkyPi Pro.
I was able to get the RetroPie software setup and drivers for the display and key controls working, though the display needs some work. It is very slow and tears a lot, so I'll need to look into additional options here.
Outside of that, all buttons and controls work (with the exception of clicking IN the joystick and the touch screen, but I'm OK with out those for now). And I've been able to test some brief gaming.
I'm now printing off a fresh new case, and waiting on some new PLA colors as well as some of the 502248 batteries to arrive.
I did have to increase the case height by 4mm overall due to the overwhelmingly tall GPIO header on the display hat.
A few items I need to change,
Make the A/B/X/Y buttons taller, but between .6mm and 1mm total
Lower the height of the joystick by 1-2mm total, it stands abit too high off the case
Make a couple "mount wafers" basically thin layers of plastic to mount modules onto and separate components... i.e. Mount amp/charger and volume wheel to, separate battery from audio circuits.
Once I wrap up those few items and tweak the software build, I'll test assembly and then release the files on Thingiverse.
I think the longest wait now is going to be the batteries coming from China, though now having to increase the case height, I may look for a larger capacity battery to till the space since we have it.
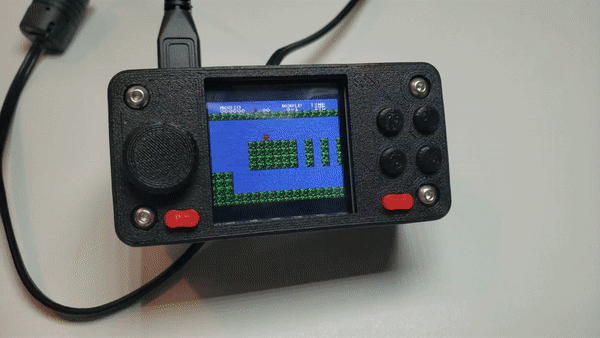
Glancing around the net (no deep dive as of yet), the basic information I can find about the Display used in this device is a ST7789 display/controller. This is still an assumption and I'm not sure if this is actually the case.
I played the working PinkyPi vs the beta PinkyPi Pro, and the Pro display is much much slower on the same games.
So the plan is to try the fbcp-ili9341 Fast SPI driver. This should resolve the issues, same as it has with the original PinkyPi build.
I've also got build 1.4 of the case design on the print bed being printed as the time of writing this. This should be some of the final touch-ups to the design before I consider it possibly "public ready".
Though I feel I still want to install ALL hardware before I take that leap, and the battery is the big hold up here. (Shipping times)
Lastly, due to the increased height of the case due to the display hat Pin header, I am again looking into battery options for possibly a larger capacity battery to take advantage of the space I am forced to deal with due to the hardware.
Thus far I have had no luck with the new display driver, though I am starting to find out more information and details about the device.
From what I can gather;
The Data Control pin is 22 and the Reset pin is 27.
I've tried the following build parameters for the updated driver thus far and to no avail.
cmake -DSPI_BUS_CLOCK_DIVISOR=30 -DGPIO_TFT_DATA_CONTROL=22 -DGPIO_TFT_RESET=27 -DST7789=ON ..
cmake -DSPI_BUS_CLOCK_DIVISOR=30 -DGPIO_TFT_DATA_CONTROL=22 -DGPIO_TFT_RESET=27 -DST7789VW=ON ..
cmake -DSPI_BUS_CLOCK_DIVISOR=30 -DGPIO_TFT_DATA_CONTROL=22 -DGPIO_TFT_RESET=27 -DST7735S=ON ..
I've been skimming through this list in an attempt to locate all 240x240 TFT displays and determine what controller IC it may be using, but still no luck. I'm thinking I either have the wrong information, or the driver doesn't support the controller in use as of yet.
I do plan to reach out to the developer if I hit a solid stop gap, I've already reached out to the seller on Alibaba to determine if they have any tech specs they can share.
I've got the case printed out in Grey, and I'm awaiting 2 shades of purple so I can mimic the US SNES Style joystick once the colors arrive. Sadly I doubt they'll be a 1-1 color match, but it should atleast give the general effect.
Here is PinkyPi next to PinkyPi Pro - Beta.
Again, I am awaiting on hardware and batteries before I can "finish" the first build of the Pro model, and now is still just case refinement and design.
I did end up emailing the primary vendor / manufacturer as well just now, asking if they had and tech specs or datasheets available to share, or if they could provide answers to my specific questions, i.e. what Display Controller IC is in use, verify the Data Channel pin and Reset pin as well as seeing if they have a backlight pin.
As soon as I determine the best route to go with the display, I will get the image created and share it along with the PinkyPi standard image, the plan being;
PinkyPi - 1.3inch LCD Image / Case
PinkyPi - 1.4inch LCD Image / Case
PinkyPi Pro - 1.5inch LCD Image / Case
As each requires different display drivers and settings, and that will unlock the full PinkyPi family. The only version missing from here is PinkyPi Slim, that I am still working on finishing.
The slim version is basically the standard PinkyPi minus the Battery layer, thus requiring a powered Micro USB connection, giving you options for what kind of device you want.
I've gotten word back from the manufacture, per Spotpear the IC is in fact a ST7789 and the DC and RST pins are in fact DC = 22 and RST = 27 (Pi BCM Pin Numbers)
And they also pointed me back to the driver set I am looking at https://github.com/juj/fbcp-ili9341
They were also kinda enough to provide a pinout for the device, now I can look into why the Joystick click in button isn't registering as well.
Now for the minor task of figuring it all out.
Still no joy on the driver, I've found where some users have luck with the ST7789VW setting during the make of fbcp-ili9341, so I've tried both the ST7789 and ST7789VW, no luck.
Oddly, the DC is listed as PIN 22 and RST as 27, with using Pin22 as DC in the command directives during the make process and running, I get no output, and blank screen.
If I use DC=27 during the build and then start the display driver, it flashes for just a second and you can see the boot text. So I'm not sure if this is just showing something thats in the frame buffer and tricking me, or if I actually should be using PIN 27 as the DC.. It just makes no sense.
More to come here, I may have to reach out the fbcp-ilil9341 devs and see what they have to offer.
I do think later tonight I may try the same setup on a Pi 3 to see if it being a pizero is causing a problem.
Hi!
First of all congrats for this project!
I ordered also this tft hat (will take a long time to arrive...) and I noticed you are facing some problems with the drivers.
Have you tried this http://spotpear.com/learn/EN/raspberry-pi/Raspberry-Pi-LCD/Drive-the-LCD.html ?
Hi!
First of all congrats for this project!
I ordered also this tft hat (will take a long time to arrive...) and I noticed you are facing some problems with the drivers.
Have you tried this http://spotpear.com/learn/EN/raspberry-pi/Raspberry-Pi-LCD/Drive-the-LCD.html ?
Madz, welcome and nice to have you!
The link above is actually the first route I went, I first installed their drivers on a RetroPie build, and the performance was way slow.
So I then moved over to their pre-built RetroPie image you can download, everything functioned (with the exception of clicking in the joystick), but again around 5-10 frames per second in game. So poor that game play is not feasible.
This is actually a common issue with the SPI driven screens, and the reason why fbcp-ili9341 was written. When I reached out to the manufacturer they pointed me in the same direction, to the ili9341 community driver for high frame rates and game play (below is the snip from their email)
if high 60 fps speed you can see this
https://github.com/juj/fbcp-ili9341
What I'm curious about is, if they knew that was required for playable FPS, why wasn't it bundled in their prebuilt image.
Also, I was able to locate a bug report in the git repository for an Adafruit 1.54 display on a Pi Zero, I'm assuming the 1.54 displays are fairly similar and looks like they are having an issue with the driver and the Pi Zero
https://github.com/juj/fbcp-ili9341/issues/69
I'm going to submit my own feedback here and see what we get back, while I try and get it working on my own as well.
BUT, this wont hold up progress of the project, I finished some very minor updates to the case design last night and I am at a point where the STL files should be up on Thingiverse this week.
Also I'm going to start on the hardware build, its looking like the only change thus far is the battery, so I should be able to get the amp, charger, lowpass filter, speaker etc installed this week/weekend and verify the battery fitment once they arrive.
Just a quick update, using this command directive during the driver make process, I am able to get video with the improved fbcp-ili9431 driver.
I am still tweaking the performance and response, so we are still a bit away, but major leap forward.
cmake -DWAVESHARE_ST7789VW_HAT=ON -DGPIO_TFT_DATA_CONTROL=22 -DGPIO_TFT_RESET_PIN=27 -DSPI_BUS_CLOCK_DIVISOR=6 ..
Below is the build commands I am currently using with RetroPie to get the display driver working
cd ~
sudo apt-get install cmake
git clone  https://github.com/juj/fbcp-ili9341.git
cd fbcp-ili9341
mkdir build
cd build
cmake -DST7789VW=ON -DGPIO_TFT_DATA_CONTROL=22 -DGPIO_TFT_RESET_PIN=27 -DUSE_DMA_TRANSFERS=ON -DSPI_BUS_CLOCK_DIVISOR=4 -DDISPLAY_ROTATE_180_DEGREES=ON -DSTATISTICS=0 ..
make -j
sudo ./fbcp-ili9341
Then use
sudo nano /etc/rc.local
and append
sudo /home/pi/fbcp-ili9341/build/fbcp-ili9341 &
at the bottom and save
good job as soon as you have ready the 3d project I go with the print waiting for the screen and all the rest thanks for everything
I do seem to be running into an issue I'm troubleshooting currently.
I can't tell right away if its hardware or software, but the start button just ceases to function and starts working again randomly.
I'm going to start with some different builds of the video driver, if I can't fix it from there (clock divisor settings, DMA channel settings etc), I'll then pull the device apart and failback to my multimeter and see if the switch hardware itself is failing.
I am also still getting somewhat poor performance on the emulators and games, that seems the miniboy image and its retropie build make run better, so I need to check and see if its running RetroPi 4.1.
Per this article users with Raspberry Pi Zero have noticed a performance drop between 4.1.0 and newer versions of RetroPi, so I've grabbed RetroPie 4.1.0 and I'm going to mess with that abit as well
