Using a real operating system to simplify programming with the Arduino IDE. Is this possible and how? Let’s have a closer look!
Operating systems were invented to simplify our lives. But, because they need a lot of resources, they only run on reasonable computers like the Raspberry Pi or a PC. Right? Wrong. Nowadays, we also get operating systems running on our small MCUs. Particularly interesting in this respect is the ESP32 because it has enough power and memory to accommodate such an additional burden. And the best: It already runs a version of FreeRTOS with all our Arduino sketches, and it is easier than you think. Is this useful?
Month: April 2021
How to measure your Pulse with Arduino (Code Included)
What is a Pulse Sensor?
The heart rate sensor measures your heart rate in Beats per Minute using an optical LED light source and an LED light sensor.
Pulse Sensor Code and Library : https://github.com/rolan37/Pulse-Sens…
Cast Spells on Devices with This Magic IoT Wand
Sam March can now “magically” control smart outlets with a wand that detects gestures and sends them via Bluetooth.
As stated best by the writer Arthur C. Clarke, “Any sufficiently advanced technology is indistinguishable from magic.” Internet-connected homes can certainly feel like magic sometimes, as every appliance, light bulb, and outlet can all talk to each other and relay information for increased convenience and efficiency. However, just saying a command to your favorite digital assistant or pressing a few buttons on an app isn’t that fun, which is why Sam March decided to invent a novel way of activating smart outlets — through a magic wand. By performing certain gestures, the user can cast “spells” on specific outlets through Bluetooth.
Create automated game collection (RetroPie 4.6)
Create an Automated Game Collection in RetroPie 4.6
Boochow’s RaspberryPi Pico Receives and Decodes MIDI Signals via Its USB Port
Developed using the TinyUSB library, this project receives MIDI messages via USB and decodes them for printing via UART.
Pseudonymous developer “boochow” has used the popular Raspberry Pi Pico in the heart of a MIDI device with a difference: Rather than making music, it’s designed to monitor and display the MIDI signals received from a USB MIDI device.
Building a better battery analyzer with Arduino
Your favorite device has just run out of juice, so you quickly take off the cover and reach into that old stash of alkaline batteries you have lying around. After trying countless combinations, you still cannot be sure they’re working properly, as each one has been slightly used. If only there were a way to know.

I Remade GTA: San Andreas Because Rockstar Wouldn’t
I remade an intro cinematic from Grand Theft Auto: San Andreas using Unreal Engine 4. GTA: SA is one of the best games of all time, so it should be remade. Rockstar, please!
Etching tiles with multi-color (painted layers)
I keep having to up the anti. First it was white tiles with one color or paint. Then white tile with two colors of paint. Now I am trying white tile with FOUR colors of paint and some with three. I will be laying down a combination of yellow, orange, red, and black. Also yellow, green, and black.
The idea is to burn through the black to show the color under it. Also to burn through that color to reveal the color under that and so on until you get down to the white tile. I wanted to try doing the sun tile again with the yellow, orange, red, and black paint. That way as I burned deeper into the paint, it would look like the hotter parts of the sun. There were two major mistakes I made with this project. The first was to not wait long enough between layers of paint.
This caused the next layers to interact with the layer under it to make it look cracked. The yellow also spat out of the cat at first. I had not had this happen before. I knew it could be an issue and that is why you should always do a quick test spray from the can to insure a fine mist before you spit paint onto your target. In addition to not waiting long enough between layers was to put a NON-WATER BASED clear finish on the tiles.
This also reacts with the paint and bubbles it up. Kind of like putting lacquer thinner on paint to remove it. The textures look is kind of cool but not what I was going for.
In Car Emulation Test Using The CarDongle! Android PC for Your Car
In this video, we test out some emulators running on the new CarDongle! The CarDongle Is An Android PC For Your Car and with this, you can easily add a full android OS to your vehicle with access to Google Play, Netflix, youtube, Android Auto, Android Games, and Emulators Like RetroArch, PPSSPP! We test out some NES, SNES, Game Boy Advance, Dreamcast, and PSP. So can this thing run emulators on our car’s built-in screen? Let’s find out
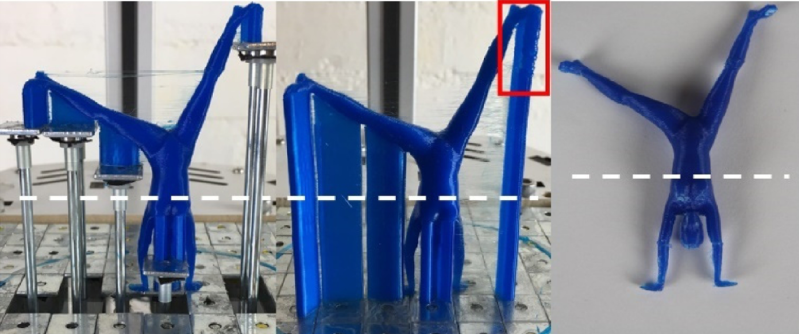
Dynamic Build Platforms for 3D Printers Remove Supports and Save Material
We’re all too familiar with the 3D printing post-processing step of removing supports, and lamenting the waste of plastic on yet another dwindling reel of filament. When the material is expensive NinjaFlex or exotic bio-printers, printing support is downright painful. A group at USC has come up with a novel way of significantly reducing the amount of material that’s 3D printed by raising portions of the bed over time, and it makes us wonder why a simpler version isn’t done regularly.
In the USC version, the bed has a bunch of square flat metal pieces, with a metal tube underneath each. The length of the tube determines the eventual height of that square. Before the print is made, the bed is prepared by inserting the appropriate length tubes in the correct squares. Then, during the print, a single motor pushes a platform up, and based on the height of the pin, that portion of the bed raises appropriately, then stops at the right height.