Oracle Builds a Supercomputer with 1,060 Raspberry Pi Computers

Raspberry Pi is definitely the world’s most popular single-board computer brand, and that popularity is primarily a result of their low cost and small size. Those factors make Raspberry Pi boards ideal for compact projects, and for portable devices in particular. Oracle, however, has taken the complete opposite approach and built a supercomputer made from a cluster of 1,060 Raspberry Pis.

Read more…

balena releases first fully functional 64-bit OS for the Raspberry Pi 4

Today, we are excited to announce the release of 64-bit balenaOS for the Raspberry Pi 4, providing support for the full 4GB of memory and allowing the simultaneous, side-by-side running of 32-bit and 64-bit Docker containers – a first for the Raspberry Pi 4!

BalenaOS is an open-source, minimal, Yocto Linux-based host OS tailored for containers. It enables a fast and modern workflow for many different embedded device types, now including the Raspberry Pi 4, in a delicious new 64-bit flavor.

Read more…

(Yet Another) Raspberry Pi in Space!

It’s perhaps a bit surprising how many Raspberry Pi boards have made it to space. Totally ignoring all the Raspberry Pi boards that make it into space the cheap and cheerful way on a high-altitude balloon, there are at least two aboard the International Space Station in use by the astronauts, and another two running cryptography experiments for ESA.

There are others, but they were joined in July by yet another Raspberry Pi that was carried to orbit by a Russian Soyuz-2–1b Fregat-M rocket into a solar synchronous orbit.

Read more…

Commodore 64 Revamp With Raspberry Pi, Arduino and Lego

This project lets you rediscover the 1980’s gaming scene by resurrecting an old Commodore 64 home computer using new components and those ever-versatile Lego bricks! If you had one of these computers, this build will let you replay forgotten games and beat old high scores.
If you’re new to retro-computing, now’s your chance to see why the Commodore 64 was so incredibly popular.

Read more…

PCEI Multiplier Expands Raspberry PI 4 Possibilities

It probably goes without saying that hardware hackers were excited when the Raspberry Pi 4 was announced, but it wasn’t just because there was a new entry into everyone’s favorite line of Linux SBCs. The new Pi offered a number of compelling hardware upgrades, including an onboard PCI-Express interface. The only problem was that the PCIe interface was dedicated to the USB 3.0 controller; but that’s nothing a hot-air rework station couldn’t fix.

We’ve previously seen steady-handed hackers remove the USB 3.0 controller on the Pi 4 to connect various PCIe devices with somewhat mixed results, but [Colin Riley] has raised the bar by successfully getting a PCIe multiplier board working with the diminutive Linux computer. While there are still some software kinks to work out, the results are very promising and he already has  a few devices working.

Read more…

‘80s-Style Music Player Combines VFD Displays with Raspberry Pi Streaming

Redditor GuzziGuy misses “1980s-style HiFi systems with flashing lights, knobs, etc.” Instead of just ignoring this impulse, however, he “decided to make one that looked/worked exactly as [he] wanted.”

The device uses a Raspberry Pi 3 running Mopidy to stream both locally stored music and Internet radio. A Behringer UCA202 USB audio interface along with a TPA3116 amp are implemented to actually pump out the tunes. The UCA202 includes an audio passthrough, which can play from other audio sources, e.g. GuzziGuy’s computer.

Read more…

RetroPie – Expanding storage on your SD card.

Most RetroPie images you download wont take advantage of all the free space on your SD card, so how do you expand the partition to utilize the remaining space?
raspi-config is the option we are looking for!

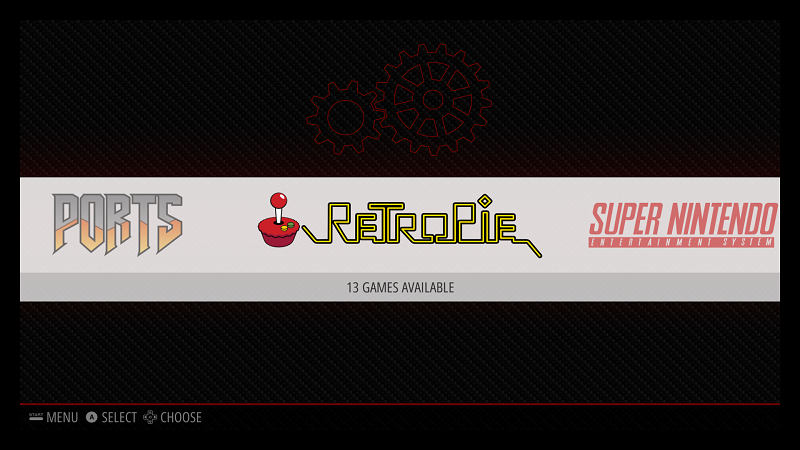
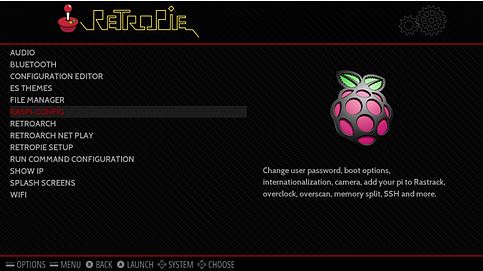
This menu can either be accessed from the main menu once everything is booted.

First Navigate to the RetroPie Settings menu

From here you can access raspi-config

It is also possible to access this menu from command line and an SSH session.

For instructions on getting your RaspberryPi connected to WiFi and setting up SSH, take a look at our other Tutorials;
Configuring RetroPie to connect to WiFi with no keyboard or display.
Configuring RetroPie for SSH with no keyboard or display.

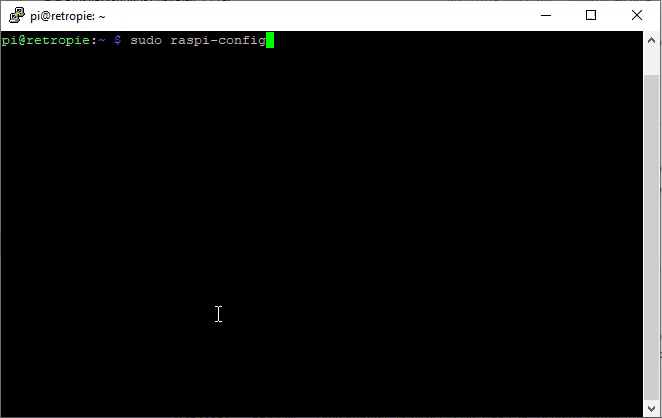
Once you are at the command prompt running the following command will load up the raspi-config menu.

sudo raspi-config

Once in the raspi-config menu, you will want to navigate to
(7) Advanced options
(A1) Expand Filesystem

This will all be pretty automatic, it will grow the file system to take up the remaining space on your SD card.
Once complete, choose OK at the reboot warning, Finish and then allow the device to reboot.

Once rebooted your Retropie setup will utilize all available space on your SD card for ROMs and other data!

How To Install RetroPie On The Raspberry Pi 4 – RetroPie Pi4

In this video, I show you how to install RetroPie on The new Raspberry Pi 4,. As of making this video, we are still waiting on an official RetroPie image from the RetroPie team so this tutorial is a bit different. We will be installing RetroPie inside of Raspbian I also show you how to configure games and make RetroPie automatically boot when you start up your Pi4.

Eben Upton on the Raspberry Pi’s Industrial Crossover and Why There Will Never Be a Pi 9

Seven years ago, Eben Upton created the first Raspberry Pi. As Upton told IEEE Spectrum in our March 2015 cover story, the Pi was inspired in part by his childhood experiments with a BBC Micro home computer: He wanted modern kids to have a simple machine that allowed for similar experimentation. Since then, the Pi has exploded in popularity, and the fourth major revision of the Pi was released in June. Upton talked with Spectrum senior editor Stephen Cass about the Pi 4’s design, its growing commercial use, and what might be next.

Read more…