As makers, we are extremely lucky that today we can have affordable, professional-level PCBs fabricated on demand in small quantities and shipped to our doorsteps in just a week or two. Those are absolutely your best option if you’re working on projects that require custom boards and you want them to come as close as possible to consumer devices. But the week or two it takes to get PCBs fabricated and shipped can be too long for quick projects and you may not want to spend the money anyway. That’s why Redditor Duzitbetter came up with a really clever way to 3D print the circuit board for this Raspberry Pi Pico-based macro keyboard.
External News
3D Printing : (the famous) Ikea Lack enclosure for Ender 3 Pro
Background
There are a lot of article on the Internet about this topic. How to “turn Ikea Lack tables to 3D printing enclosure?” This is a trending topic. But to be honest, I never find the one that takes your by hand from start to beginning. This is the challenge of this post and I really hope you will like it !
Let’s go !
First, you need a minimum of two Lack tables from your local Ikea store. It works perfectly with three if you want a higher construction. For me two pieces are the ideal size since it will be on my desk. But if you want to have the furniture laying on the ground, three is indeed a better choice.

The Troubled Origins of .ZIP | Nostalgia Nerd
PKWare, PKZIP, PKUNZIP, these are all names which mean something significant to me. For most of the 90s, the PK tools were probably the most frequently used in my toolbox. Compressing Doom from my mate’s PC across several floppy disks, creating my own VB installers, downloading data from bulletin boards or the early internet. It was an essential compression/decompression tool. But, the story of its origins is a little more tarnished than perhaps you would expect. If you’ve hard of SEA and their ARC file format, you might already know. Let’s dive in.
How to Make a Tic Tac Toe Using a TFT Touchscreen
In this project, I will show you how to make a Tic Tac Toe with a TFT Touchscreen.
This code displays a Tic Tac Toe on your TFT screen. This game can be played using the tactility of your screen.
The first screen displays the title and some explanations about the game. The second screen is the “playing board” : it’s here that you can place your pads.
There are two type of pads : red and blue pads (because this game can be played only with two people). If someone win, a message will be display (“Victory, Player 1/2 win !”) and the game starts again. If nobody win, another message will be displayed, saying : “No winner.”.
A made a Phase Angle Meter using an Arduino
Energy Metering IC available here: https://www.tindie.com/products/whatn…
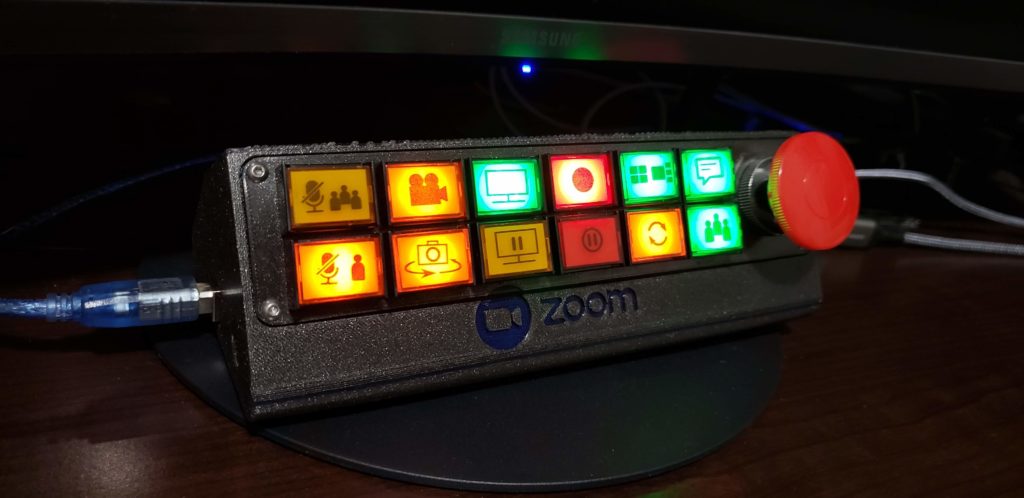
A pushbutton control panel for your Zoom calls
Today with most people working from home using teleconferencing applications, a custom control panel for such interactions could come in handy. This inspired professor Elena Long to design her own Zoom interface around an Arduino, a 3D-printed enclosure, and a series of pushbuttons that allow for custom printed icons.
Long’s device features 12 main buttons — five momentary, seven latching. These are wired to light up via LEDs. There’s also a large red mushroom button on the end provides a final latching input, which is perfect for aborting calls with a flourish.
Ashcon Mohseninia’s Rust-Based Open Vehicle Diagnostics Aim to Break the Manufacturer Stranglehold
Written in Rust, Open Vehicle Diagnostics aims to reach feature-parity with expensive manufacturer-specific ECU management solutions.
Undergraduate student Ashcon Mohseninia has released a Rust-based open source tool, created for a final year project at the University of Reading, designed to offer engine control unit (ECU) diagnostics: Open Vehicle Diagnostics (OVD).
“I know there are some open source diagnostic software suites out there that work on Linux,” Mohseninia writes of the project. “However they are focused on the ELM327 adapter and OBD2, whereas this is focused more on the more advanced diagnostics, essentially building a utility which could have feature parity to OEM diagnostics software such as Daimler’s Veidmao/Xentry/Das or VW VAG software.”
Fabricating fully functional drones
CSAIL’s “LaserFactory” system automates the full process for making functional devices in one system.
From Star Trek’s replicators to Richie Rich’s wishing machine, popular culture has a long history of parading flashy machines that can instantly output any item to a user’s delight.
While 3D printers have now made it possible to produce a range of objects that include product models, jewelry, and novelty toys,we still lack the ability to fabricate more complex devices that are essentially ready-to-go right out of the printer.
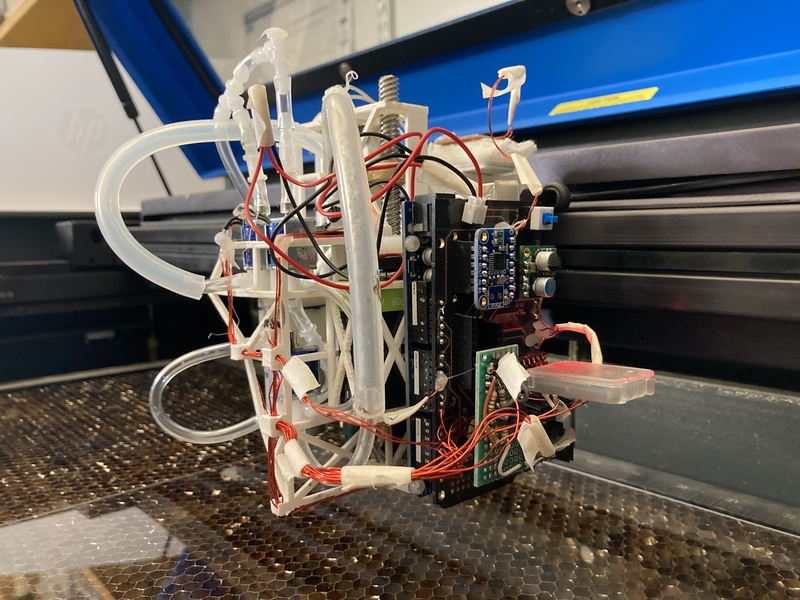
DIY Mini CNC Laser Engraver.
This is an Instructables on how I Remixed my old CNC Laser engraver and made a Stable version of an Arduino based Laser CNC engraver and thin paper cutter using old DVD drives and using 250mW laser.
Old Version of My CNC :https://www.instructables.com/id/Mini-CNC-Laser-Wood-Engraver-and-Paper-Cutter/
Old version was not much stable and had some wobble due to uneven parts, so I decided to make a stable version of it using 3D printed parts. Which gave me excellent results in laser engraving even in very tiny details, this machine is cable of doing the work well. You can see the details in the eye of the engraved picture.
Playing area is 40mm x 40mm max.
M5StickC Plus (ESP32) Game Console (5 Games)
In the past, I created couple games for the TTGO T DISPLAY board. M5StickC Plus has same size display, it has built in buzzer, battery, you can carry it in a pocket and it si also powered by ESP32. If you add this joystick module you have a little pocket game console. I edited Togo games so now I can run them on M5Stick C Plus board. Feel free to use and modify my code.