This is a cool way to count coins. It’s a scale that, with the help of Arduino, a display and a push button, can count the amount of Euros coins on the plate. At the beginning, you need to calibrate the scale by pressing the button with the empty plate, and then with four coins of two Euros. You just need to follow the instructions on the display, and, at the end of the process, you will have the value in Euros of the coins. This was possible because each coin has a specific weight. Such weight never changes, and as long as you follow the instructions, all will be very accurate.
DIY
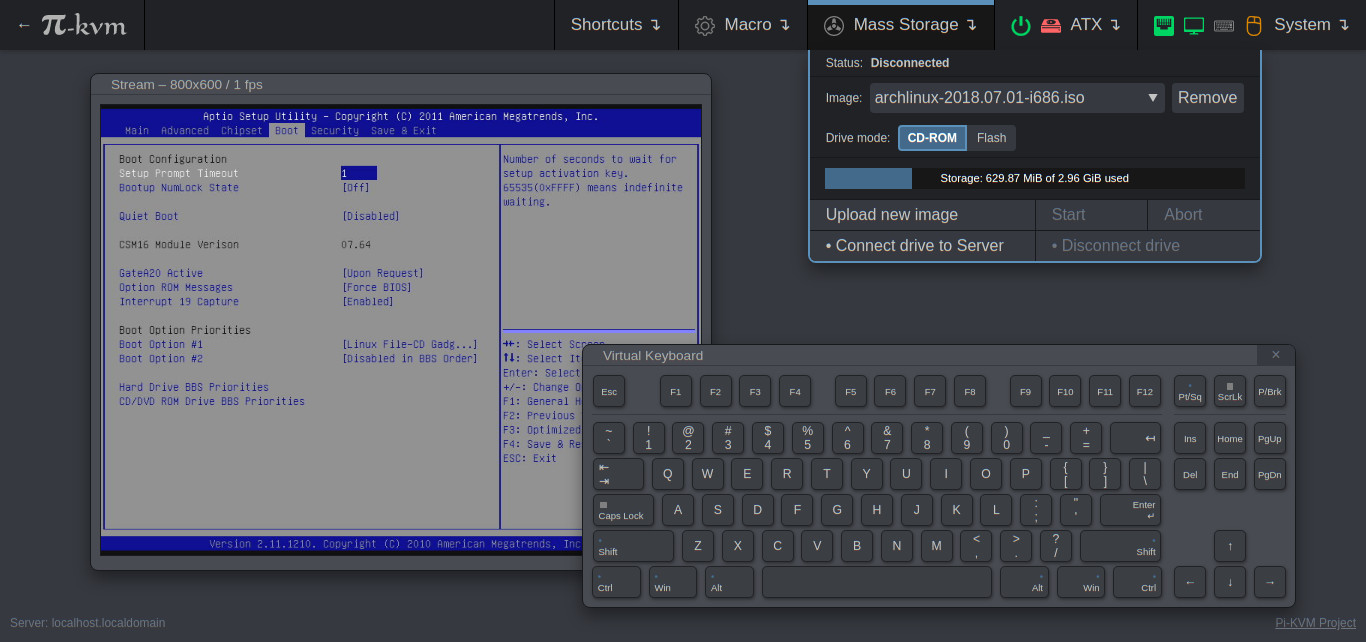
Pi-KVM – Open and cheap DIY IP-KVM on Raspberry Pi
A very simple and fully functional Raspberry Pi-based KVM over IP that you can make with your own hands without any soldering!
This device helps to manage servers or workstations remotely, regardless of the health of the operating system or whether one is installed. You can fix any problem, configure the BIOS, and even reinstall the OS using the virtual CD-ROM or Flash Drive.
It only costs between $30 and $100 depending on the features desired. Even the most expensive configuration will be cheaper than a $500 commercial IP-KVM.
Arduboy CE (Cartridge Edition)
Arduboy CE places the MCU onto a removable game cartridge so you can swap out games like the good ol’ days!
Game cartridges are so nostalgic! And Arduboy is all about the nostalgia. Designed to be reminiscent of the original DMG Game Boy, Arduboy CE (Cartridge Edition) combines both concepts!
LAM – Laboratory Arduino Mobile
You’ll learn how to construct your own Arduino laboratory.
This Pizza Compass Directs You to the Nearest Slice No Matter Where You Are
With the advent of GPS and the handy Google Maps, traditional compasses seem pretty outdated. They’re not as intuitive, and they only point north. But what if there was a smart compass that pointed you towards what you really want, like, say, pizza? Engineer Joe Grand recently built a compass that directs you to the nearest slice of pizza no matter where you are. And in the wise words of pizza connoisseurs, the Teenage Mutant Ninja Turtles, it’s totally tubular.
DIY SDR DSP Radio with Raspberry Pi and RTLSDR Dongle
The radio presented above is capable of receiving the entire spectrum, from 500 kHz to 2 Gigahertz.
Software-defined radio (SDR) is a radio communication system where components that have been traditionally implemented in hardware (e.g. mixers, filters, amplifiers, modulators/demodulators, detectors, etc.) are instead implemented by means of software on a personal computer or embedded system.
A Better LoRa QWERTY Messenger
Introducing the next iteration of the Ripple LoRa QWERTY Messenger project, now with ultra low power standby mode!
Streamer-Focused Arduino-Powered Sparkpad Packs Keys, Volume Control, OLED Display, and More
Supplied as a kit with open source firmware, the Sparkpad aims to be a one-stop device for streaming, video editing, and more.
Maker Patrick “Paddy” Thomas has launched a display-equipped RGB macro pad, or “reconfigurable control surface,” built around an Arduino Pro Micro and with streamers in mind: the Sparkpad.
“The Sparkpad is a reconfigurable control surface, primarily aimed at Streamers. The V1 Sparkpad is designed to communicate with streaming software — such as OBS – via HID commands sent over USB,” Thomas explains of the design. “However, due to its modular hardware design and open source Arduino firmware, there is scope to do much more. We are hoping to foster a development community, and we will continue to develop improvements for the Sparkpad as and when we can.”
Bluetooth Controlled LED Matrix
A hand-crafted 8×8 LED matrix driven on Arduino using the MCP23017 GPIO expander and controlled via Bluetooth from an Android device.
The internet is littered with tutorials teaching how to use dot matrices or build them, so why add-in another one I hear you say? Simply because making LED displays is fun, the outcome is eye-pleasing and useful in every way you could imagine. And since we’re at the age of IoT, what a better way to interact with it than from your smartphone. I used the LED matrix I built as a scrolling ticker, just to showcase the versatility of such a device. In the following I’ll shed some light on the essential building blocks of this project.
A Mini Bluetooth Dot Matrix Printer
This ATmega328P-powered device is like a tiny modern-day telegraph printer.
YouTuber Et Discover built a miniature printer that’s controlled by his phone over Bluetooth. The device uses a pen as the marking device and a micro servo and linkage system to move it back and forth. The small strip of paper is advanced by a 24BYJ-48 stepper motor, along with a ULN2003 driver, allowing for sequential control over pen placement.
What’s interesting from a mechanical standpoint is that the pen doesn’t descend to the paper to make each dot, but instead the rig employs an electromagnet to bounce the paper up to hit the pen. A neodymium magnet is embedded in the small printed platform that rises up to receive a dot, and a boost converter is used to produce 24 volts for actuation.