A hands on demonstration of the HoloLens 2 AR Headset.
Cura Fuzzy Skin and Ironing on 3D Prints
Chuck shows you how to 3D Print Smooth or Textured surfaces using Cura Fuzzy Skin and Ironing on 3D Prints using a Creality Ender 3. These two features in Cura 3 offers you the option to 3D print a very smooth top layer or to make the outer surface textured for a good grip. He shows you how to set this up and how to use it with the ENDER 3 in this week’s Filament Friday.
The Most Powerful Original Xbox – FriendTech DreamX 1480 – Teardown, Games, Emulators and More | MVG
In 2004 – FriendTech released the most power Xbox console to target the media player martket in the living room. Known as the DreamX-1480 it boasts some very powerful features that make it the most powerful Original Xbox you can find. Lets take a closer look at the console , tear it down and see how well it performs !
Turning a $10 Original Xbox into an awesome Emulation device | MVG
Watch how Modern Vintage Gamer transforms a $10 Original Xbox Thrift Store find to an awesome device that in 2019 still provides a compelling emulation and homebrew experience.
Kill Mii: Portable Wii in an Altoids Tin
According to Shank Mods , he made the worst Wii Portable ever. This is a REAL Wii, not an emulator, in an altoids tin. This project took about a year and was miserable to complete.
Using Etcher to write a Raspberry Pi image to SD card.
Did you download an image or .img file for your Raspberry Pi and you are not sure how to get it running, are you creating a RetroPie game console for Raspberry Pi and you are looking to flash RetroPie to an SD card?
First things first, download balena Etcher and run through its install. Once installed we can continue to flash our image.
Once you have the image you wish to use, such as;
Raspbian or Noobs
RetroPie
OctoPi
Or our PinkyPi images
And then launch balena Etcher and insert your SD card into your computer.
Once Etcher loads, click “Select Image” and browse to the .img file you have and wish to flash to your SD card, in our example I used OctroPi.
Next you can choose your SD card drive, it does attempt to auto detect any SD cards inserted into your PC, so if you have more than one you must specify what device to write to.
Last, click Flash, and it will start writing data to the SD card, depending on the size of the image and speed of your SD card this can take several minutes.

If you wish to do the reverse, and make an image or .img from an existing Raspberry Pi install on an SD card, check out our tutorial on using Win32DiskImager for just that task.
Ways to play NES Light Gun Games on a Modern TV
An overview of the problem light guns have with the modern television set, and a couple of ways to overcome it.
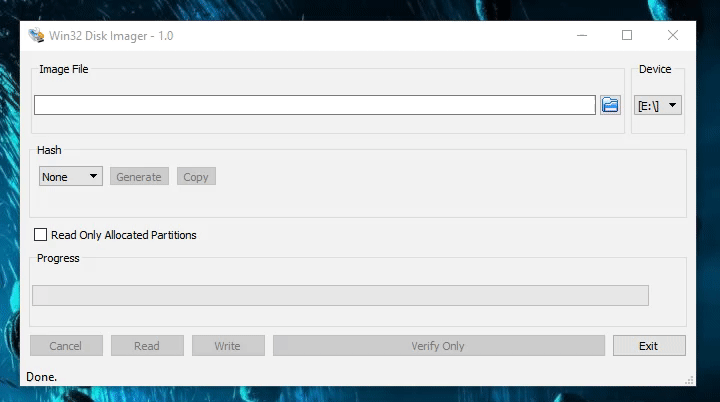
Backing up and Cloning your Raspberry Pi SD card in Windows.
Are you looking to make a backup of your Raspberry Pi, have you spent weeks setting everything up and want to save an emergency copy? Or are you looking to clone your RetroPie build efforts to multiple SD cards?
Check out Win32DiskImager a free Open Source disk image tool for SD cards on Windows.
Once you have Win32DiskImager installed, connect your SD card you wish to save to an img file and launch Win32DiskImager.
First we want to choose where to save our .img file, in my example I store it in C:\img\copy.img
Next we will choose the SD card we wish to read, in my case it’s the E: drive.
Another key item to check is “Read only allocated partitions”, this will read only the in use data on the card and drastically reduce the creation time and file size of our .img backup file.
Once we’ve chosen our destination, where our SD card is and the optional Read Only Allocated Partitions, we can then click the “Read” button at the bottom. This will start the backup process, once it finishes you will now have a bit by bit copy of your Raspberry Pi disk to save for reinstall, cloning or just a general backup of your effort.
If you wish to flash this image to an SD card, or any other image / .img file to an SD card, check out our tutorial on flashing an image to SD.
Smallest 3D Printer? The Creality CR-100, is it worth it?
Naomi ‘SexyCyborg’ Wu takes a look at one of the smallest FDM printers on the market- the CR-100. It there any reason to buy small over large? Watch to find out!
There is a 3D printer review in here?
The Official Pi Cart Build Video! A Raspberry Pi Retro Gaming Rig in an NES cartridge [Full Build]
Build your own Raspberry Pi retro gaming rig inside an original Nintendo cartridge for maximum portability and awesomeness. 🙂 This is the official build video for the first ever PiCart guide!