A Cheap Dipole Antenna From an Extension Cord

Dipoles are a classic builder’s antenna, after all they are usually little more than two pieces of wire and a feedline. But as [Rob] shows us in the video below, there are a few things to consider.

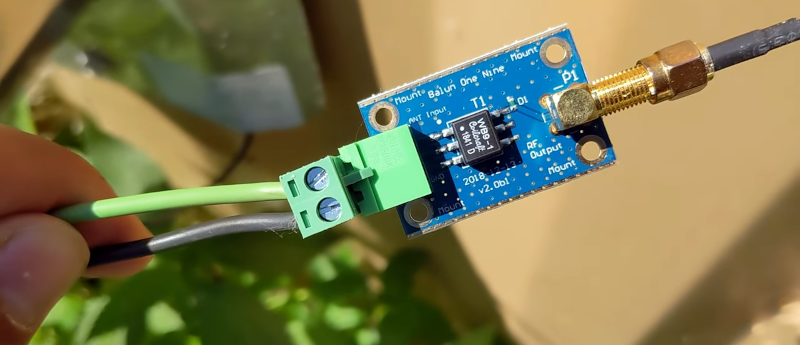
The first thing is where to get the wire. A damaged extension cord donated the wire. That’s actually an interesting idea because you get multiple wires the same length inside the extension cord. Of course, it is easy to just pull the conductors out of the extension cord, but how do you feed it? A small balun converts the unbalanced feed line into a balanced connection for the antenna. Although the title says “free dipole” this balun is commercial and probably cost something unless you happen to already have one. However, building a balun isn’t all that tricky, either if you happen to have a ferrite toroid.

DIY Si47xx All Band DSP Radio with 2.8 Inch Touch Display

This time I will show you how to make a relatively simple All band Radio Receiver which is based on the Si47xx series chip of Silicon Labs. This wonderful radio is is primarily a result of the hard work of Ricardo Caratti who creates the detailed library for the Si47xx chip, Gert Baak for the initial TFT code, and Thiago Lima which creates the Kit with a TFT touch display.

Read more…

DIY Fume Extractor Clears the Air as You Solder

Open Green Energy’s device consists of a 120mm PC cooling fan and a 3D-printed enclosure.

If you’ve done any amount of soldering, you’ve likely been annoyed by fumes from solder and flux that seem to be automatically attracted to your face. Smelly and potentially toxic, it’s best to route these fumes elsewhere, preferably through a filter of some sort to keep them from simply annoying someone else.

You can, of course, purchase a fume extractor; however, good units can cost upwards of $70, so why not build one yourself? In the video below, Open Green Energy demonstrates how to do just that, using 3D-printed components made with blue and yellow filament to match up with his Hakko soldering station.

Read more…

PiFire – Raspberry Pi Zero W based Smoker Grill Controller using Python 3 and Flask/Gunicorn/nginx

This project was inspired by user dborello and his excellent PiSmoker project (http://engineeredmusings.com/pismoker/ and https://github.com/DBorello/PiSmoker). I encourage you to check it out and get a rough idea of how this all works. This particular project was built around a Traeger Texas smoker grill platform, but should work for most older Traeger models (or other brands with similar parts like the older Pit Boss) built with similar parts (fan, auger, and igniter). I’ve built the code in a way to be somewhat modular & extensible such that you can replace the grill platform with your own specific platform instead. Newer Traeger grills with their newer wifi enabled controllers have DC components (instead of the AC Fan / Auger) and aren’t covered by this project.

Read more…

Gorgeous Specimen is the Final Word in Clocks

At this point, it’s safe to say that word clocks aren’t quite as exciting as they once were. We’ve seen versions that boil the concept down to what amounts to a parts bin build, which for better or for worse, takes a lot of the magic out of it. You just get an array of LEDs, put some letters in front of it, write some code, and you’re done.

But then [Mark Sidell] sent in his build, and we remembered why we collectively fell in love with these clocks in the first place. It wasn’t the end result that captivated us, although the final clock is indeed gorgeous, but the story of its painstaking design and construction. The documentation created for this project is unquestionably some of the best we’ve seen in a very long time, and whether or not you have any desire to build a word clock of your own, you won’t regret sitting down and reading through it.

Read more…

This OpenSCAD Script Helps You Design Hot-Swappable Keyboards

If you want to design your own hot-swappable mechanical keyboard, this OpenSCAD script can help.

Mechanical keyboards are all the rage these days, and for good reason. They are more pleasant to type on and may even help to prevent repetitive stress injury (RSI), which is a problem that affects many office workers. Cheap keyboards have membrane switches, which are mushy and force you to push a key hard to ensure a key press is registered. Mechanical keyboards, on the other hand, have mechanical key switches that have a clean and consistent “break” point. Some keyboards even let you swap out the key switches to customize the feel. If you want to design your own hot-swappable mechanical keyboard, this OpenSCAD script can help.

Read more…

Boilarm – Never again do you have to check whether your water is boiling.

Never again do you have to check whether your water is boiling. Put on your headphones and let your phone notify you!

Have you ever had to wait for your water to boil to make some pasta, but you hate waiting for it? Or, has it ever happened to you that you put the water pot on the stove, put on your headphones and forget you ever left it there? If these bring some resemblance to you then we have the perfect product for you!The Arduino BLE paired with our mobile app allows you to do other important things while the water is heating up. When the water boils, the app simply tells you that the water is boiling, even if you’re in another room.So put the water on the stove, turn on our device, put on your headphones and relax. We’ll take of the rest. 🙂

Read more…

How to make an Arduino custom I2C slave sensor/device

In this video, I’m exploring the idea of having your own I2C slave devices and sensors where a helper Arduino is used just for the sensor and the main controller does all of the control logic.

In my case, the slave I2C device is a dedicated controller for a motor speed controller (AC dimmer) that monitors the AC zero-crossing point and it listens on a specific I2C address for the speed at which the motor should run.

By using two separated Arduino Nanos, I can utilize the interrupt pins on both controllers where the one on the slave device will monitor the zero-crossing signal and the other one can be used for interfacing with the UI through a rotary encoder.