Configuring RetroPie for SSH with no keyboard or display.

Accessing your RetroPie project over SSH allows you to configure drivers, software and settings with out having a keyboard or even a screen connected to your Raspberry Pi.

You can enable SSH from the Boot folder of the SD card, first we must put the SD card in our computer and open the Boot folder.

Create a file in this folder called ssh with NO extension (no .txt, no .conf, no extension)

Once this file is created, you can boot your RetroPie Raspberry Pi build and access the device over SSH to do the work and configuration you need to.
If you are a Windows user, be sure to check out PuTTy to access the device over SSH.

The default hostname for Retropie is, retropie
And the default username and password are pi / raspberry

If you would like to setup your WiFi in the same way, check out our WiFi guide.

Configuring RetroPie to connect to WiFi with no keyboard or display.

Looking to connect your RetroPie project to your WiFi, but have no display or keyboard connected? RetroPie allows us to place a file called wpa_supplicant.conf in the boot folder of the SD card.

Connect your SD card to your computer and open the Boot folder.

Create a file called wpa_supplicant.conf in this folder, I use notepad++ to assure compatibility with the RetroPie OS.
For best results, set the End Of Line conversion to Unix (LF)


And add the following text, be sure to modify the settings to match your network and location.

country=US
ctrl_interface=DIR=/var/run/wpa_supplicant GROUP=netdev
update_config=1

# RETROPIE CONFIG START
network={
    ssid="Your-network-name"
    psk="Your-network-password"
}
# RETROPIE CONFIG END

Save this file and your ReptroPie device should now boot and connect to your network.
By default the device name is retropie , and you should be able to locate this on your network.

This is assuming you are using WPA and RetroPie 4.1 or higher for your build.

For more RetroPie network options, check out the Official RetroPie WiFi Setup Guide

If you wish to configure SSH on your device as well, Check out this guide.

A Guide To Safe Remote Access of OctoPrint

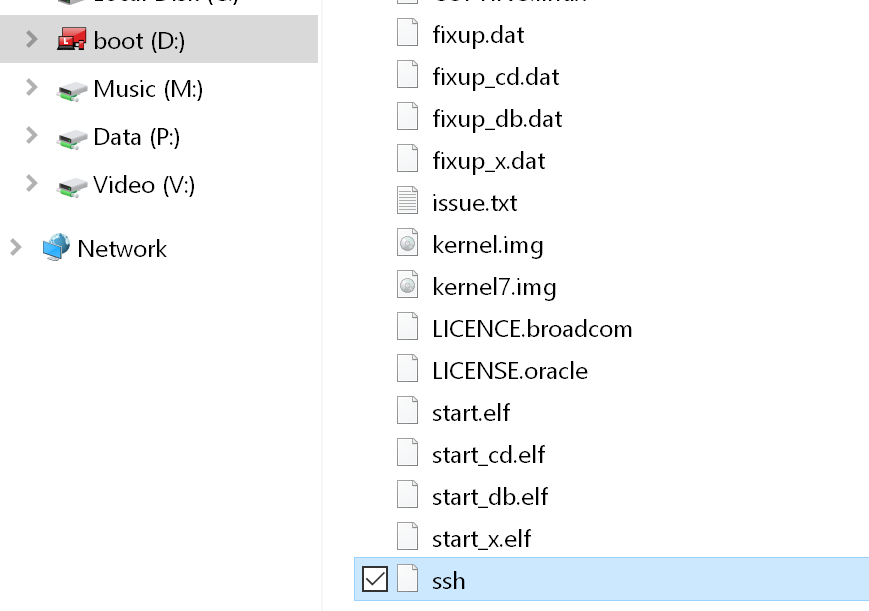
So, you’ve got your shiny new printer, and just installed OctoPrint, great! Being able to remotely monitor your print is a fantastic ability. Being able to start a print remotely is incredibly handy. From within the realm of your local network, you have a ton of power at your finger tips. What if you want to be able to do this when you’re not on your local network? You could just forward ports on your router, use a DDNS service, and you’re good to go, right? … wrong.

The ISC (Internet Storm Center) recently published an article about OctoPrint instances exposed to the public internet. While it is possible that a percentage of the instances found are unintentionally exposed, the vast majority is very likely users who have gone out of their way to expose OctoPrint to the public internet for the sake of convenience. There are safer ways to access your instance remotely than blind port forwarding. This is a critical issue that needs to be discussed. We as a community have to get the right information to new and/or uninformed users, to prevent a catastrophy from happening.

Putting OctoPrint onto the public internet is a terrible idea, and I really can’t emphasize that enough. Let’s think about this for a moment, or two, or even three. OctoPrint is connected to a printer, complete with motors and heaters. If some hacker somewhere wanted to do some damage, they could. Most printers can have their firmware flashed over USB. So as soon as the box hosting OctoPrint is comprimised, there go any failsafes built into the firmware. All one would have to do, is flash a new, malicious firmware with no safeguards, over USB, and then tell the printer to keep heating, leading to catastrophic failure. Of course there are other reasons to not have an OctoPrint instance available on the public internet, such as sensitive data theft, but catastrophic failure is by far the worst case scenario here.

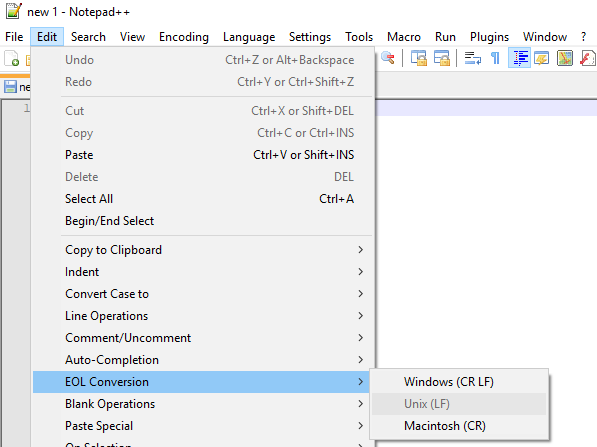
So, with that said, how can we accomplish remote access to monitor or control a printer, without putting OctoPrint on the public internet for everyone to abuse? This guide will show you how.

Read more…