How to determine what RaspberryPi you have from Command Line

Do you have a Raspberry Pi, yet aren’t sure exactly what make/model or hardware you have? The following will show you exact details about your device.
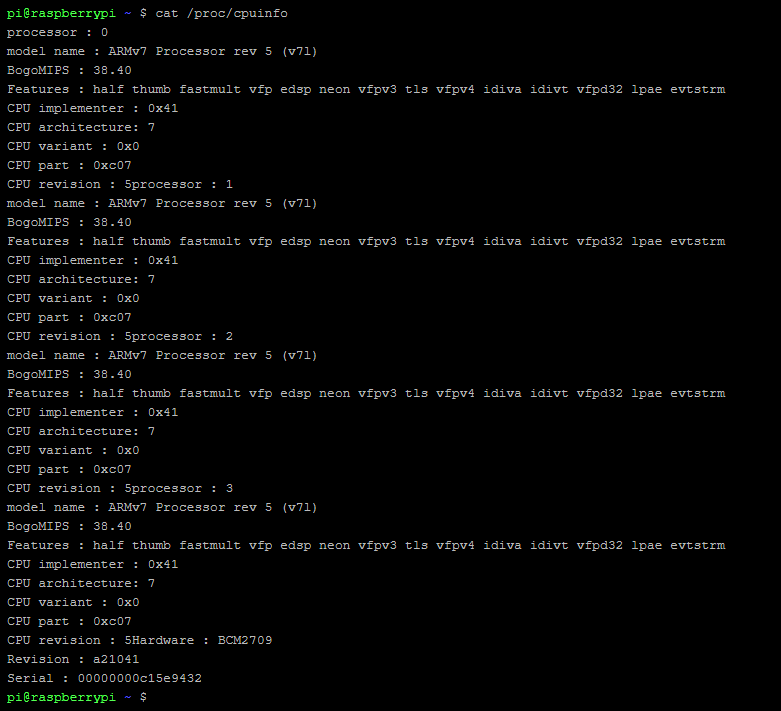
From a command line, or SSH session into your Raspberrry Pi, run the following command.

cat /proc/cpuinfo

And look for the line that states – Revision, this can then be cross checked with the list below.


RevisionRelease DateModelPCB RevisionMemoryNotes
BetaQ1 2012B (Beta)?256 MBBeta Board
0002Q1 2012B1.0256 MB
0003Q3 2012B (ECN0001)1.0256 MBFuses mod and D14 removed
0004Q3 2012B2.0256 MB(Mfg by Sony)
0005Q4 2012B2.0256 MB(Mfg by Qisda)
0006Q4 2012B2.0256 MB(Mfg by Egoman)
0007Q1 2013A2.0256 MB(Mfg by Egoman)
0008Q1 2013A2.0256 MB(Mfg by Sony)
0009Q1 2013A2.0256 MB(Mfg by Qisda)
000dQ4 2012B2.0512 MB(Mfg by Egoman)
000eQ4 2012B2.0512 MB(Mfg by Sony)
000fQ4 2012B2.0512 MB(Mfg by Qisda)
0010Q3 2014B+1.0512 MB(Mfg by Sony)
0011Q2 2014Compute Module 11.0512 MB(Mfg by Sony)
0012Q4 2014A+1.1256 MB(Mfg by Sony)
0013Q1 2015B+1.2512 MB(Mfg by Embest)
0014Q2 2014Compute Module 11.0512 MB(Mfg by Embest)
0015?A+1.1256 MB / 512 MB(Mfg by Embest)
a01040Unknown2 Model B1.01 GB(Mfg by Sony)
a01041Q1 20152 Model B1.11 GB(Mfg by Sony)
a21041Q1 20152 Model B1.11 GB(Mfg by Embest)
a22042Q3 20162 Model B (with BCM2837)1.21 GB(Mfg by Embest)
900021Q3 2016A+1.1512 MB(Mfg by Sony)
900032Q2 2016?B+1.2512 MB(Mfg by Sony)
900092Q4 2015Zero1.2512 MB(Mfg by Sony)
900093Q2 2016Zero1.3512 MB(Mfg by Sony)
920093Q4 2016?Zero1.3512 MB(Mfg by Embest)
9000c1Q1 2017Zero W1.1512 MB(Mfg by Sony)
a02082Q1 20163 Model B1.21 GB(Mfg by Sony)
a020a0Q1 2017Compute Module 3 (and CM3 Lite)1.01 GB(Mfg by Sony)
a22082Q1 20163 Model B1.21 GB(Mfg by Embest)
a32082Q4 20163 Model B1.21 GB(Mfg by Sony Japan)
a020d3Q1 20183 Model B+1.31 GB(Mfg by Sony)
9020e0Q4 20183 Model A+1.0512 MB(Mfg by Sony)

The above is obtained from eLinux.org

PuTTY Releases Important Software Update to Patch 8 High-Severity Flaws

The popular SSH client program PuTTY has released the latest version of its software that includes security patches for 8 high-severity security vulnerabilities.

PuTTY is one of the most popular and widely used open-source client-side programs that allows users to remotely access computers over SSH, Telnet, and Rlogin network protocols.

Almost 20 months after releasing the last version of its software, the developers of PuTTY earlier this week released the latest version 0.71 for Windows and Unix operating systems.

Read more…

What’s the best PC gaming controller thus far for 2019?

Our friends at PCGamesN.com review and break dow a wide range of PC compatible gaming controllers so you can choose the best for your setup.

The best PC Controllers are –

Read more…

Using GPIO Pins for Joysticks and Buttons in ReptroPie

Having worked somewhat more than a little bit with PinkyPi and PinkyPi Pro, I had to figure out how to get the buttons and joysticks to work with the display hat buttons. These were wired to GPIO pins on the Raspberry Pi.

This is where mk_arcade_joystick_rpi comes into play, designed to work with buttons and joysticks connected to the GPIO pins on the RaspberryPi.
You can use this in items such as our PinkyPi project, DIY handhelds and Minicades as well as full upright Arcade cabinets!

(Taken from the git page)
It is written for 4 directions joysticks and 8 buttons per player. Using a MCP23017 extends input numbers to 16 : 4 directions and 12 buttons.
It can read one joystick + buttons wired on RPi GPIOs (two on RPi B+ revision) and up to 5 other joysticks + buttons from MCP23017 chips. One MCP23017 is required for each joystick.

But for 1 player and in 2 player need situations, the setup is fairly simpleI


Installation

Download the installation script :

mkdir mkjoystick
cd mkjoystick
wget https://github.com/recalbox/mk_arcade_joystick_rpi/releases/download/v0.1.4/install.sh

Update your system :

sudo sh ./install.sh updatesystem
sudo reboot

You must reboot before the next step :

sudo sh ./install.sh

Loading the Driver

For a single player setup, use the following.

sudo modprobe mk_arcade_joystick_rpi map=1

Or for a 2 player setup, use the following.

sudo modprobe mk_arcade_joystick_rpi map=1,2
Single Player Pin layout
2 Player Pin layout

There are several other options for pin settings and mappings, that can be found in the GitHub for the original project

Auto load the driver at Start up

sudo nano /etc/modules

and add this line at the bottom to load the driver :

mk_arcade_joystick_rpi

Then create the following file /etc/modprobe.d/mk_arcade_joystick.conf :

sudo nano /etc/modprobe.d/mk_arcade_joystick.conf

and add the following line with your mapping configuration :

options mk_arcade_joystick_rpi map=1

Testing and troubleshooting

Before we start into RetroPie, you can do a test and verify the output and functionality of each button.

To test player 1 or a single player setup, use;

jstest /dev/input/js0

To test player 2 on a 2 or more player setup, use;

jstest /dev/input/js1

The same if you have more players, just increase the “js#” value at the end.

You can then see an output of all your buttons and their status, off is default and when the button is active they goto on.

Once everything checks out, load up RetroPi and run through the controller configuration.
You may need to reset your configuration if you have already had an existing controller setup.

The $139 NVIDIA Shield TV – An Emulation Powerhouse | MVG

The NVIDIA Shield TV is one of the most powerful Android based 4K streaming media player devices complete the NVIDIA Tegra X1 chipset and fast clock speeds. It’s capable of emulating GameCube, Dreamcast , Nintendo 64, Sony PSP and much more. It was recently was on sale for as low as $119 over the Black Friday holiday weekend and MVG picked one up! Modern Video Gamer takes a deep dive on just how well it performs and if its worth the money!