This mechanical clock tells time using steel balls

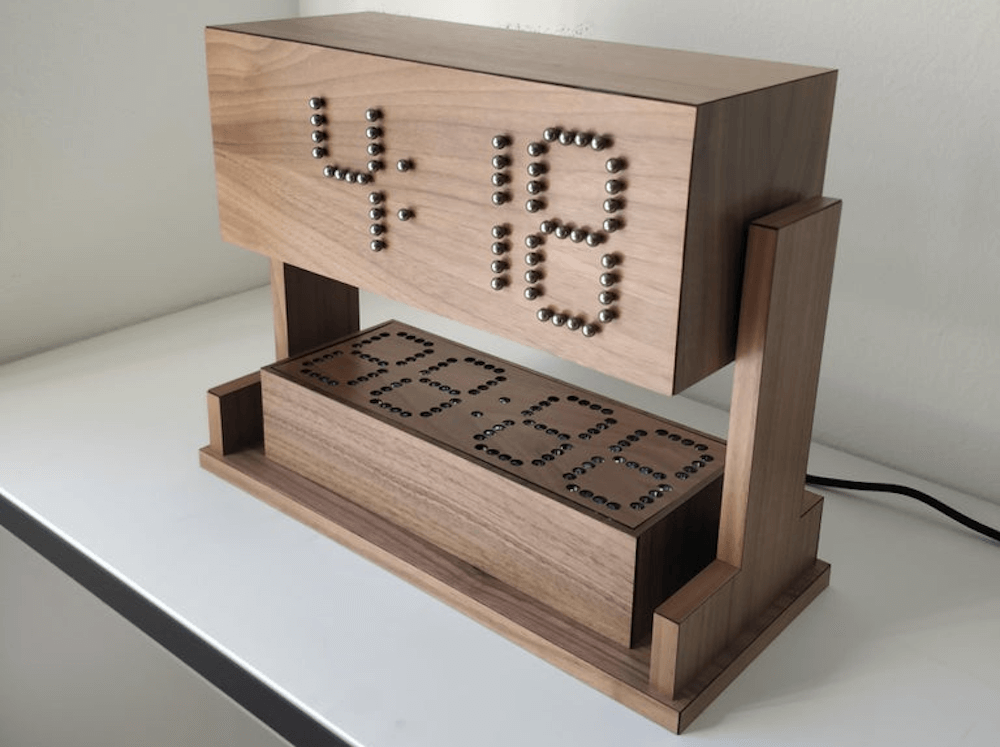
There’s certainly no shortage of DIY clocks in the Arduino community; however, Eric Nguyen has come up with a rather unique way of showing hours and minutes: steel balls arranged as seven-segment displays.

For each time change, the face rotates down and a tray of arranged balls is lifted up to meet it via a servo motor assembly. Inside, a series of 28 servos capture and release the balls using magnet and linkage systems, plus another for the colon.

Read more…

How to Make an Interactive Coffee Table: Reactive LED Coffee Table | Arduino Projects

In this video we describe how to make an interactive coffee table using ws2812b leds and an Arduino. Not only does this coffee table have WS2812b leds and can display cool light animations, but it doubles as an interactive coffee table that lights up when things get up close to it. It functions by creating a cluster of nodes made up of 2 IR emitters, 2 photodiodes, and 4 ws2812b leds. Upon program startup, each node reads a base value of the ambient light. When an object gets close to the node, Infrared (IR) light is bounced off the object and into the photodiodes. This causes the diodes to change voltage and thus lets the arduino know if something is close. The IR emitters and photodiodes basically act like a proximity sensor and anytime something gets close to it, the sensor will go off. Please comment with any questions you have and like the video if you enjoyed it. If you want to see more content like this one, consider subscribing.

DIY Pin Pointer Metal Detector

A traditional metal detector can locate a burried item and give you a rough location of the object belw the ground

A pinpointer enables you to pin down an object’s location, make a smaller hole when digging, and extract the item. Also, it can be used as handheld metal detector used by emergency responders to conduct security screening of individuals at access control checkpoints.

Read more…

This bike blinks brightly to the beat!

Natasha (AKA TechnoChic) is a member of a bicycle club that goes for rides at night during the summer, and while off-the-shelf lights are fine, she wanted something a bit more interesting. To accomplish this, while learning more about the technologies involved, she decided to equip her bike with an array of addressable LEDs.

The bike frame’s NeoPixels run on an Arduino Nano 33 IoT, which is connected to a boombox via a 3.5mm jack that enables the LEDs to react to the music. Two other Nano 33 IoT boards are used to drive the lights on each of the wheels, with the eventual goal of linking them wirelessly for central control. The system is powered by a 10,000mAh battery pack along with a pair of 2000mAh LiPos for the wheels to keep things glowing for several hours.

Read more…

Leadscrew Buddy upgrade for 70 year old lathe

My lathe is quite old. It is a Myford M type. This design was originally manufactured by British company Drummond until Myford took over manufacture in 1941.The manufacturer’s plate of my lathe has 1949 stamped on it.
 
It’s a pretty basic lathe, but it fits into the very limited space I have in my garage workshop. Recently I needed to use power feed on the lead screw, which is when I realised it could do with a modern upgrade.

As with most low tech lathes, the lead screw is driven from the spindle via a set of gears, and by changing these the feed speed can be set. On my lathe the gears are proper 1940s metal things, and the gear assembly involves interlocking them with pins and adjusting two mounts that can be swivelled to allow for the differing diameters.

Read more…

Tachometer (RPM Meter) || DIY or Buy || How a 3€ sensor outdoes a 29€ product!

In this episode of DIY or Buy we will be having a closer look at a commercial tachometer (RPM Meter) and test it in order to find out that it is pretty much unusable. Afterwards I will show you how a 3€ IR distance sensor works and how we can use it to build a proper DIY tachometer that functions properly. Let’s get started!

A 3D-Printed SCARA Robot Arm That Won’t Break the Bank

In the world of industrial robots, six-axis models are perhaps what comes to mind. However, SCARA – Selective Compliance Assembly/Articulated Robot Arms – are also quite common, for applications where complicated 3D orientation isn’t needed. While these machines can cost many thousands of dollars, and are normally refined over years of work, YouTuber How To Mechatronics created a version of his own using four NEMA 17 motors and an array of 3D-printed components.

As seen in the video below, the device employs timing belts and pulleys inside the segments for power transmission and gear reduction in the horizontal direction. The Z-axis is driven by another stepper, along with a lead screw, held in place with a series of four rods and linear ball bearings. For the “hand” portion, a servo motor controls an end effector, enabling it to pick and place objects as necessary.

Read more…